23
submitted 4 days ago by Cowbee@hexbear.net to c/food@hexbear.net

One of my favorites is Mujadara. For those unaware, it's a dish of lentils, rice, and both fried and caramelized onions. It seems to tick all the boxes, and when you add vegan yogurt and some greens, it's delicious.

What are your favorite staples?

top 19 comments
sorted by: hot top controversial new old
[-] came_apart_at_Kmart@hexbear.net 9 points 4 days ago* (last edited 4 days ago)

Dal. though the word is used in multiple contexts. it's a lentil or legume based curry, crazy versatile. scoop with naan (the easiest and fastest of all breads) or serve with rice.

I started with red lentils (Masoor Dal) because they are basically peeled brown lentils so they prepare quickly when starting from dry. dry lentils are CHEAP. my Masoor dal recipe is tomatoes, onions, garlic, ginger, some cumin seeds, ground tumeric, coriander powder, red chili powder. a little lime juice and garam masala at the end. it's tastes exciting and feels rich/hearty without slowing you down.

if you are looking for ideas/inspiration on making the wide world of lentils/legumes exciting, I recommend the "660 Curries" book by Raghavan Iyer, which I endorse for anyone who wants to have a tremendous and straight forward reference on South Asian cooking, using/unlocking many, many spices.

this is the book which taught me that "curry" means "sauce" basically, and they can be all over the place, flavor and spice wise.
[-] ProfessorOwl_PhD@hexbear.net 3 points 3 days ago

I would argue chapattis are even easier and faster, but otherwise correct. I prefer brown lentils because they hold their texture, and start by boiling them with onion, ginger, tumeric, and a whole chilli, then add some tomato paste and salt once I start reducing. Once it's reduced it comes off the heat and I fry garlic, onion, a pinch of chilli flakes and a shit load of cumin seeds in plenty of oil, and stir it all into the daal once the garlic starts to caramelise. The only problem is the 4 hours of soaking and hour+ of boiling and reducing that brown lentils need.

[-] Cowbee@hexbear.net 3 points 3 days ago

Excellent recs, I love Dal, especially Dal Makhani.

[-] HexBroke@hexbear.net 3 points 3 days ago

With coconut you can also make a sambol with basically the same ingredients, takes about a minute of mixing and is a great meal accompaniment

[-] ReadFanon@hexbear.net 6 points 3 days ago

Lentils with sorghum or millet. It's hard to think of a more environmentally-sustainable dish than that.

[-] HexBroke@hexbear.net 5 points 3 days ago

Mushrooms growing in the closet?

[-] ReadFanon@hexbear.net 4 points 3 days ago

True.

Anything that you're growing yourself, especially from waste products, is going to blow pretty much anything else out of the water.

For example, oyster mushrooms growing on your cardboard waste is going to be near-zero environmental footprint by itself. If you use rainwater and add in the reduction in environmental costs due to reduced runoff that contributes to eutrophication of waterways and the reduction in costs associated with transporting and recycling that cardboard waste, the embodied environmental footprint is probably going to start looking like a net-negative one which is pretty astonishing.

[-] Cowbee@hexbear.net 4 points 3 days ago

Kind of obsessed with this kind of self-reliant food sourcing, and making the bulk of my staples from scratch or bulk dried ingredients if possible.

[-] ReadFanon@hexbear.net 3 points 3 days ago* (last edited 3 days ago)

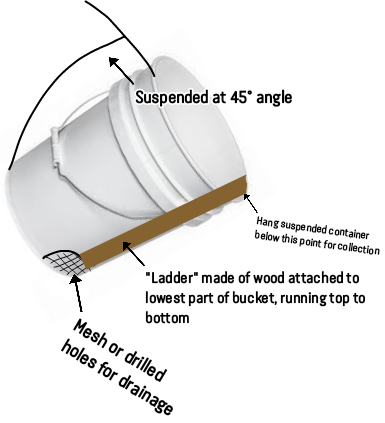
Here's a goofy little diagram of a self-harvesting black soldier fly larvae composter that I described, in case anyone wants to get an idea of what I'm talking about:

Note that you may want to use the bucket's lid - just cut a hole in it so that there's an exit point around the "ladder" which the larvae will use to get out of the bucket from. BSF larvae will outcompete just about anything else and they seem to emit a pheromone or something that deters other critters like flies once they've colonised a patch so once it's going you're unlikely to have any problems from small pests.

Scrap wood is ideal for making the "ladder" with but you can use whatever material you have lying around that is going to survive the conditions and which is rough or textured enough that the larvae will be able to cling on to it to crawl out.

The collection container is optional but just make sure that it's tall enough that if you get a large number of BSF larvae collected that they won't be able to crawl out the top. (Although it's probably not the worst idea to let a few larvae pupate so you're putting some BSF back into your local environment rather than trapping all the eggs and harvesting the larvae. It's hard to imagine making a noticeable dent in the local BSF larvae population with this given how prolifically they breed but you never know.)

I forgot to mention that ideally you should put a BSF egg trap directly above the compost. BSF love to lay their eggs in tight crevices so without a trap it's not uncommon that they'll lay eggs around the rim of the bucket if the lid is on but you can maximise your chances easily with about two minutes of extra labour.

The simplest option is to get something that is corrugated like cardboard or corrugated signboard (y'know the plastic stuff that has the same structural pattern as corrugated cardboard). Cardboard won't last forever so you'll have to replace it occasionally if you use that as the material. You can cut a few pieces and stick them together if you like, or just use one piece and affix it to the top point of the bucket on the opposite point to the "ladder", near the rim of the bucket. Don't forget to cut a small hole in the top of the lid so that BSF are enticed to enter near the trap to lay their eggs. You could also use 1" wide strips and stick them on the upper half of the inside of the bucket, using as many strips as you like (remembering that you must cut the material the right direction so that you're maximising the number of exposed holes).

Some people take corrugated material and roll it which is fine but you have to be careful not to crush too many corrugated channels and tbh it's a bit overcomplicated. A few flat layers of corrugated material fixed together will work just as well but even using a few layers is probably overkill for a small setup like this bucket.

If you wanted something more permanent and less plastic-y, you could get some scrap wood and drill holes in it on all exposed surfaces to make something resembling honeycomb using a drill bit which is roughly the same width as the holes in cardboard corrugations. Personally I couldn't be fucked doing something like that but if you enjoy woodwork and you're killing time then go nuts.

Also it's worth mentioning that most BSF bins for sale are ridiculously pricey, overcomplicated, and not necessarily any more effective than a bucket with a few holes, a bit of wood, and a bit of cardboard at the top. They are the worm farms of the BSF world - expensive pieces of plastic that are designed to make the whole thing seem more complex than by rights it should be so that consumers are convinced they need to buy some purpose-designed crap that may require significant intervention to maintain.

BSF larvae happily colonise piles of cow shit without any outside intervention, just like how compost worms will colonise a pile of decaying vegetable matter without needing any help. Don't let the marketing convince you otherwise.

[-] ReadFanon@hexbear.net 3 points 3 days ago* (last edited 3 days ago)

Very cool!

A few words of advice:

Don't use the laundry basket method of growing mushrooms. I don't really trust it tbh. Mushrooms are really good at remediating heavy metals and shit from whatever they're in contact with and I just don't think it's worth the risk because you don't know what dyes have been used in a laundry basket or what it's going to release as it breaks down, especially if it's exposed to sunlight. Just use a foodsafe bucket instead and cut holes into it in a similar pattern to a laundry basket (or use smaller holes), it might cost a few extra dollars but it's going to be safer. You can also use a second bucket of the same size as a reusable outer container to reduce light and to maintain humidity if you do it this way.

Check out semi-aquatic plants. Obviously their need for watering is reduced because of this but water is also a great weed suppressant measure. Watercress is extremely nutritionally dense and easy to grow. Similarly, water spinach (ipomoea aquatica) grows like a weed to the point that it is a weed but it really good as a stir-fry or steamed vegetable (you can also eat it raw but note that if aquatic snails consume human waste and find their way to your water spinach, this can transmit diseases [giardia etc.] - almost certainly an impossible situation under typical circumstances but just fyi). Sweet potato has edible leaves, grows in riparian systems, and grows very quickly. If you want to go wild, duckweed and azolla are edible, ridiculously fast-growing, and extremely nutritious. Being floating plants, they can occupy the surface areas of aquatic growing spaces around other rooted plants that you're growing. These also make ideal fodder for animals like chickens, if that's something that is on your radar. You can also do some pretty simple aquaponics with tilapia to close the loop and get a source of protein, if you do fish.

(You can also get some cool aquatic edibles like water chestnut, which once established will divide like heck to occupy whatever space is available, and duck potato - both can grow well in buckets or sealed plastic pots.)

Chaya is a great option for nutritious vegetables and it can be harvested in a major way without impacting the plant. Opt for stingless if it's available for ease of harvesting, make sure that you read up on how to cook the leaves for safe consumption though.

Nettle is another wonderful plant that grows like a weed in the right conditions and is very nutritious. Annoying to harvest, but nothing that some full sleeve gloves can't fix.

Amaranth is yet-another great option for the above. Leave some seeds to reach maturity rather than harvesting all of them and you should get volunteers all over the place next season.

Chenopodium bonus-henricus (lol) is part of the amaranth family and it's often considered a weed but it's also known as poor-man's asparagus because of its flavour, same deal as amaranth above.

Yacon, Jerusalem artichoke, skirret, springbank clover (nitrogen fixer!), achira, Chinese artichoke, American groundnut, and Pacific waterleaf are less common tubers that are perennials and good options for self-sufficient gardening.

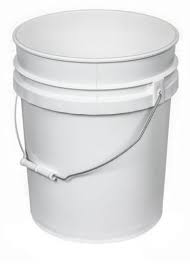
If you were going to keep chickens or similar, I would do simple hydroponic sprouting of feed grain - a series of buckets, each with drainage holes plus one sealed one can be used to start the sprouting process. Grains go in one bucket, using the sealed bucket to retain the water, then remove the outer when it's ready to start growing out, and set it aside and start another bucket. Keep growing buckets out in series, adding one each day, until the oldest is ready to harvest and then keep the cycle going indefinitely. If you get buckets that have an outer rim on them so that there's some clearance between the bottoms when they stack, like this style:

You should be able to get the day+ old bucket that are sprouting, stack them together, and water them all at once without squashing the sprouts.

Also if you're keeping chickens or similar, look at black soldier fly cultivation. Get a 5 gallon bucket, suspend it at about a 45 degree angle from a tree or a post, affix a "ladder" in the bucket for the larvae to self-harvest out of, (optional) at the lowest point of the bucket drill small holes or cut a section out and affix some sturdy mesh or layers of shadecloth or similar material (BSF larvae hate compost that is overly damp - it suffocates them [plus anaerobic compost stinks]), throw compost of any sort in the bucket including meat waste and manure (with a caution about going manure [especially chicken manure] -> BSF -> chicken feed as this may become a vector for parasites and diseases - you would need to do your research before opting for this to be safe), and either let it rip and allow the BSF larvae self-harvest directly into the ground of the chicken coop at their own pace which will allow for enrichment for your chickens or put a collection container underneath where the "ladder" and the rim of the bucket end and feed manually. Add as many buckets as you have compost available to you. BSF can also be fed to fish in an aquaponics operation. I can find a picture or diagram of what I'm talking about, or I can probably create a shitty drawing to illustrate if you need.

Also if you're keeping chickens, have a bed that grows a hardy plant that the chickens will eat. Build a chicken wire frame that sits over the bed by at least a few inches or more depending on what you're growing. Once the plants emerge above the chicken wire, the chickens will eat it but they won't decimate the plants or be able to turn up the soil where the plants are growing meaning they'll have the chance to grow back, until they get beyond the chicken wire frame where the chickens will harvest the leaves again.

Also set up an in-ground worm farm (a large plastic compost bin that it open at the bottom is probably a good bet) right beside the chicken coop. Once the worm colony is well-established, this will naturally create a steady stream of worms into the nearby soil meaning plenty will venture into the soil in the chicken coop where hungry chickens will dig them up and eat them. If you couple this with the compost/food waste pile method of feeding chickens then you probably won't need to ever buy grain for them provided that you can get a steady supply of food waste.

If you're really into self-sufficiency there's some other cool ideas that I have come across outside of food production. I'm sure there's other food growing info that I have forgotten about, but if anything comes to mind I'll put it in another comment.

[-] the_itsb@hexbear.net 2 points 1 day ago

🤩 this is amazing - thank you!!

[-] Cowbee@hexbear.net 3 points 3 days ago

I'm at a loss for words, this is a wealth of information, saving this and referencing it regularly from now on. Truly, thank you for this, comrade.

For now, I am a renter, so space is limited and I have no access to ground. Instead, I am working with my partner on growing basic herbs that we regularly use, and Green Onions. Once we can afford a small house, I will absolutely be revisiting this even further, though I will definitely take a look at your recommendations on the easier side.

I was also going to get back into fermenting, like Kombucha, hot sauce, kimchi, and other staples, and that way if I can get some good production going I can store excess goods.

Again, I can't express how useful this is, thank you.

Side note - Fanon is getting closer in my reading list, is The Wretched of the Earth the go to, or is there anything else that I should be sure not to miss? Nearly done with the major Marx/Engels/Lenin works (sans Capital for now) and want to spread out the voices I read.

[-] ReadFanon@hexbear.net 2 points 3 days ago

WotE is definitely the go-to but Black Skin, White Masks is also good reading.

I'm at a loss for words, this is a wealth of information... Truly, thank you for this, comrade.

No worries. I think I underestimated the amount of words I ended up writing lol.

For now, I am a renter, so space is limited and I have no access to ground.

There's always guerilla gardening 😈

I was also going to get back into fermenting

Very cool, fermenting is great. People report that airlocks improve lacto-fermented vegetable texture and it can be as simple as getting a brewing airlock and drilling a hole into the lid of the fermentation vessel and dropping a grommet into the hole and sticking the airlock in (and filling it with water). Top hat-style grommets are much easier for this purpose as they're easier to remove when it comes time to clean everything:

I have a recipe for sanitiser which is used for brewing but it's equally useful for sanitising fermentation vessels of any kind. If I can find it, I'll post it in a comment for you.

[-] Cowbee@hexbear.net 3 points 3 days ago

Thanks again, I'd appreciate the sanitizer recipe if you find it too!

[-] ReadFanon@hexbear.net 3 points 3 days ago* (last edited 3 days ago)

I managed to find the info again. It's from a podcast episode from way back in 2007, back during the first wave of podcasting.

So this comes directly from the guy who invented a very popular brewing sanitiser. He's a chemist by trade so he knows what he's talking about.

What you need is:

  • Fresh bleach* (ideally unscented [although at the concentration you're working with it's not really that big of a deal], definitely nothing with any other additives - the cheap store-brand bleach is best. This will be 5% concentration but you can double-check if you want.)

  • White vinegar (hold the gasps! This also needs to be 5%, don't use homemade vinegar or higher concentrations just use the normal stuff you find on the shelf at a grocery store.)

  • An attention to detail, a distraction-free environment, and enough focus that you aren't going to make any silly mistakes.

(*Fresh bleach is stuff that is clear and that has a slight yellowy-green tint, that has a chlorine odour. If it's cloudy or it lacks the chlorine odour, it's degrading and it's unsuitable for sanitising.)

Here's the recipe:

  1. Take 1.9L of water and add 3ml of bleach to the water.

  2. Stir vigorously to disperse the bleach. You can rinse the measuring container into the water or you can get a separate measuring vessel for the next step.

  3. Add 3ml of vinegar to the water and stir well.

You must do it in this order.

Never ever mix bleach and vinegar directly, or you will make toxic gas

(Just don't ever mix bleach with anything else, except in the above example following those steps.)

This is a no-rinse sanitiser, and in fact if you rinse this sanitiser off you will introduce bacteria into your vessel which will make the sanitiser less effective.

30s of contact will sanitise whatever surface it's on provided that the surface is clean before you use the sanitiser.

You can listen to the recipe here, although he uses imperial measurements and larger quantities because it's intended for homebrewers.

You could reduce the quantities in the recipe above but it gets fiddly. Using small syringes will make it easier to get to, say, the 1ml mark for the other ingredients if you're going to make up sanitiser in 630ml of water.

There's a degree of flexibility built into this recipe - you don't need to be so precise that it hurts. Don't take advantage of the margin of error and get lax about it but at the same time don't get the impression that this requires lab calibrated equipment. Working with slightly larger quantities is better in this respect because if you're aiming for, say, 0.25ml of bleach then it gets very easy to blow past the margin of error. And at the amount of ingredients we're talking, it's better to use a few cents of extra ingredients that will go to waste than it is to start playing around with quantities so small that you introduce a degree of risk which is completely avoidable. You can always use the leftover solution to sanitise other things for a bit of spring cleaning if it makes you feel better about not wasting resources.

[-] Cowbee@hexbear.net 3 points 3 days ago

Thanks, I'll be sure to revisit this in the future.

You've been a wealth of information, thank you!

[-] ReadFanon@hexbear.net 2 points 3 days ago

It's always a pleasure to share knowledge, I hope it comes in handy for you!

[-] HexBroke@hexbear.net 3 points 3 days ago

Vegetables with oil roasted

Saute onion and garlic in a pot, add vegetables with some salt - infinite soups depending on what vegetables are available

Curry and rice - infinite variations

Heat wok, add spices, then add oil, then fry vegetables. Add to carbohydrate of your choice (rice, pasta, noodles etc)

[-] CliffordBigRedDog@hexbear.net 4 points 3 days ago
this post was submitted on 24 Jun 2024
23 points (100.0% liked)

food

22153 readers
9 users here now

Welcome to c/food!

The place for all kinds of food discussion: from photos of dishes you've made to recipes or even advice on how to eat healthier.

Animal liberation is essential to any leftist movement.

Image posts containing animal products must have nfsw tag and add a content warning (CW:Meat/Cheese/Egg) ,and try to post recipes easily adaptable for vegan.

Posts that contain animal products may receive informative comments regarding animal liberation, and users may disengage by telling a commenter that the original poster wants to, "disengage".

Off-topic, Toxic, inflammatory, aggressive debating, and meta (community rules, site rules, moderators,etc ) posts or comments will be removed.

Compiled state-by-state resource for homeless shelters, soup kitchens, food pantries, and food banks.

Food Not Bombs Recipes

The People's Cookbook

Bread recipes

Please be sure to read the Code of Conduct and remember we are all comrades here. Share all your delicious food secrets.

Ingredients of the week: Mushrooms,Cranberries, Brassica, Beetroot, Potatoes, Cabbage, Carrots, Nutritional Yeast, Miso, Buckwheat

Cuisine of the month:

Thai , Peruvian

founded 3 years ago
MODERATORS